Sunday, September 24, 2006

Fib Bib

Fib Bib or How I Cannot Tell a Lie...

Another baby, another bib.

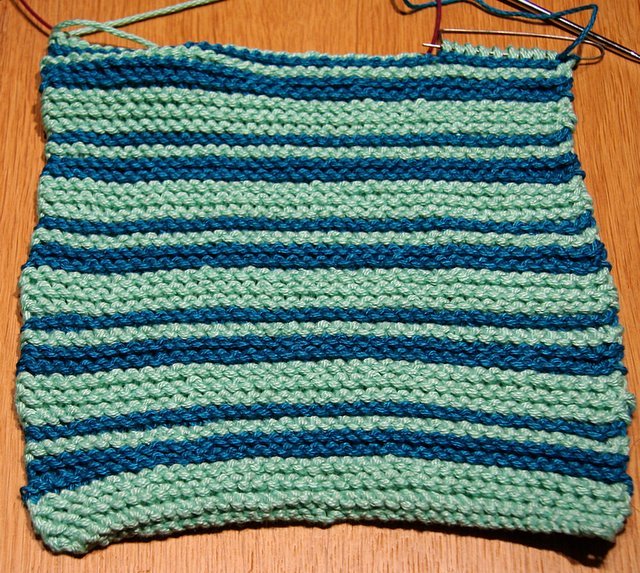
Our friends Jim and Laura just had their baby boy so time to crank out another bib. Debating between garter stripes and beaded stripes, ...... my mind started to wander: thoughts of knitting nature, New Zealand beaches, blue waters (and maybe a few rugby stripes, baby size, thrown in)...

Out came the turquoise and aqua.

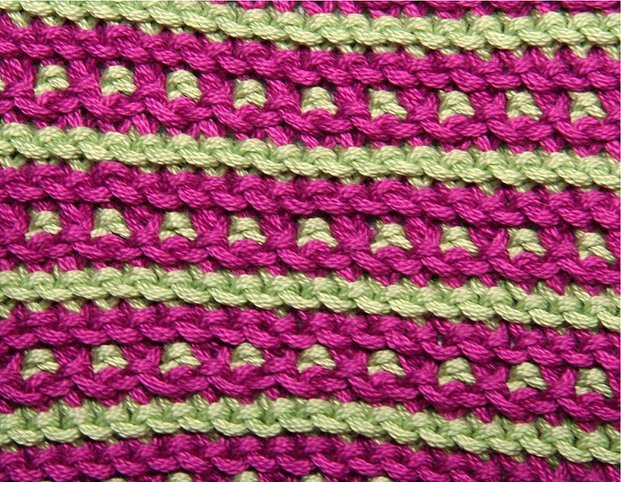
A quick count of the number of garter stripes in the bib body and and I realized that the first section of the Fibonacci sequence or series repeated several times, would be close to the number of garter stripes in the bib pattern. And, as Kay and Ann imply, it's a bib, so gauge and size are somewhat fluid...

Simply put, take the first 4 numbers generated from the sequence, reverse the order so that the largest number is first, then knit the garter stripes in alternating colors.

This is the sequence:

Start with a 0 and a 1 (you won't knit a zero (0) row (!), really.

(0 and) 1, so really:

1

0+1=1

1+1=2

1+2=3

Now, reverse the order (for this pattern sequence). You will start knitting with the "4th part of the sequence".

1 garter stripe: Color B

1 garter stripes: Color A

2 garter stripes: Color B

3 garter stripes: (this is the bottom of the bib). Color A

Keep repeating this sequence until you get to the length you want for the bib. It will be either a little shorter or a little longer than than the pattern in the book. Since you may be using a yarn with a slightly different gauge, you can decide on the number of pattern sequences to repeat.

For even MORE fun with knitting and MATH (!) check this out math for knitters. or Geometry of Design.

Feel free to experiment with this wonderful striping system that always pleases the eye and knitters and nature love.

Squint your eyes, don't you see something wavy coming on the shore? I cannot tell a lie; I just wanted an excuse to knit something warm and tropical looking. It's cold and rainy weather will soon be here...

Baby Burp Cloth Sings the Blues...

Hubbo goes out, Hubbo returns with shiny red Gibson ....

Hubbo says to knitter, "Lil' Lucille, (guitar now has a name!) needs a polishing cloth. Not just any polishing cloth; how about one of those genius baby burp cloths?"

Knitter is thinking, who is the genius here?

Labels:

Thursday, September 14, 2006

Books to Read

Tuesday, September 12, 2006

Taming the Chaos

I have to admit, am pretty addicted to circular needles.   And, it seems that most solutions for storing needles seem to be for straight needles, (not that I don't have my share of straights left over from my beginning days of knitting...)


The desire to tame the chaos (up until then, I just lived with it!) started when I received my Knit Picks Options needles.  These interchangeable needles come in plastic pouches, with zippers along the top and one side punched for a small, 3 ring binder.  The pouches are divided, so really, only the needle points fit in the sections, and the needle cables fit in another section.   A pretty good system if you have a lot of pieces and parts, or as a friend of mine used to say, " a kit of parts".


But, the rest of my needles I have always just tossed in a document case  I had left over from a project I had worked on many years ago when I was working for an design firm and we were solving their storage problems of archival materials.  The company we were doing the work for used these boxes called "Hollinger Boxes" made by of course, The Hollinger CorporationWho knew these boxes were out there?  I certainly didn't, but then, I am always learning something new...


Quilters like these boxes for storing quilts because of their acid free nature.  I know this because I inherited 15 quilts several years ago and had to figure out how to store them!!!


Hollinger also has acid free tissue paper to put between the folds of the quilts (an important part of archival storage of a quilt).  One place to get Hollinger Boxes for quilts, shows you all the box sizes, tubes for rolling quilts, and buffered and un-buffered tissue options.  But back to knitting...


I ran across this idea for circular needle storage, on the web.  Pencil pouches from Target.  I thought it was a great solution for storing circular needles, dpns, crochet hooks, stitch holders, stitch markers and all those other little "must haves" that you like to keep in one place.  


The suggestion for pencil pouches from Target is a good one.  The Target in my area only had them as a "back to school" item; not to be re-stocked after they sold out over Labor Day.  I called around and Office Depot has something similar, if you can't find them at Target.  They carry them as a standard item.  Their basic model, is 11"x7", frosted plastic on one side, clear plastic on the other side with a slide zipper on the top.  One side is punched for either a 3 or 5 hole ring binder.


The document case fits in my cabinet where I keep my stash, so all is well.  If you want to keep it on a bookcase, the letter size would probably work better, but are only 12 1/4" long.  The legal size is 15 1/4" long.


The great thing about the document case, (I use the legal size; they come in letter and legal size) is that it is long enough to put your straight needles in and wide enough to fit both my Denise case and my Knit Picks case and the pencil pouches with my other circulars, etc. in the them. 


Here is a photo of my stash of needles in my beloved Hollinger box, so worn, it is real!


Looking in a little closer, you will see my straight needles, laying down on the bottom.


Now that things are organized, I can start on those cute fingerless gloves from the last issue of Knitty.com, called "Fetching"...

Tuesday, September 05, 2006

Beaded Baby Bib-O-Love

Baby Bib-O-Love meets Vivian Høxbro.  


I was in one of our many LYS's the other day and the owner was doing something called "domino" knitting.  Always curious, I asked, "What is that?" One thing led to another and soon I was reading Vivian Hoxbro's book, Domino Knitting (Knitting Technique series).  Of course, the first thing you do is make her 9 basic squares.  OK, I didn't make ALL 9, but there was one that caught my eye, #9.  She called it "beaded". Vivian is big into garter stitch and its many variations.
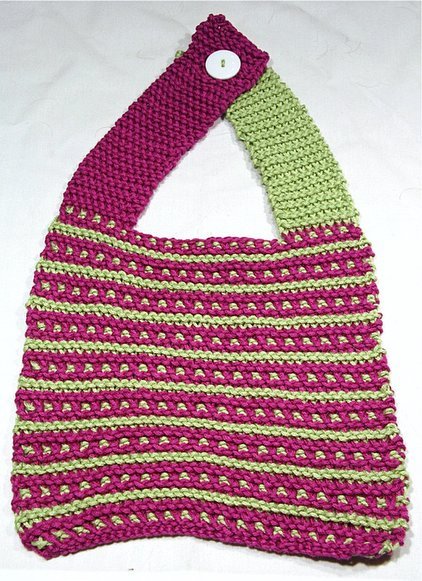
 

The beads are basically a slipped stitch worked over 2 rows of garter stitch in a contrasting color, AKA a Mosaic Garter Stitch.


Another book which has brought back the virtues of the garter stitch is Mason Dixon Knitting.  The bib pattern (Baby Bib-O-Love) looked inviting, and the thought of a striped bib seemed appealing, but those beads of Vivian's were in my mind...


I decided those bibs needed some BEADS and so...


These tropical colors are brought to you by Tahki, Cotton Classic.  


Here is a detail of slipped stitch and the "bead":


To set up a bead row, do 2 rows of garter stitch (knit every stitch on both the right and wrong sides) in fuchsia.


The row with the "bead" is worked with the green yarn over 2 rows, and one stitch is knitted, the next stitch is slipped.  So, in this example, using the green yarn (tie on the green yarn), knitting from the fuchsia row below (you knitted the row below with fuchsia) you knit one fuchsia stitch with the green yarn, then you slip a fuchsia stitch (holding the green yarn behind the work, at this point the right side is facing you), then you knit the next stitch with the green yarn, slip the next stitch, etc.  Do this all the way across the row.


(Note:  if you start this at the bottom of your work, then you cast-on in fuchsia, knit one row in fuchsia (in this example). You are now on the RS (right side) and you are ready to start the bead row in a contrasting color (in this example, green).  This bead or slipped garter stitch is done starting on the right side of the work.)


On the next row, with the green yarn, you knit any stitches you knitted in the last row and slip any stitches you slipped in the last row, always keeping the yarn in back of the work when you slip the stitches.  This time you will be working on the wrong side of the work but you will be "creating" the beads on this pass.  They will "appear" on the right side of the work.  Take a look as you work your way across and you will see them.


Now you will be back at the side where your fuchsia yarn is.   Pick up the fuchsia yarn* and do 2 rows of garter stitch or knit across and back.  This forms the border on the top of the bead and really sets the bead off by bordering it.  If you want a green stripe by doing 2 rows of garter stitch in green.  Doing a strip in the same color as the beads tends to balance the pattern and tie the 2 colors together better since the beads alone can be overpowered by other color.  


*(Note:  Here is a tip on stripes from the book, "Mason-Dixon Knitting: The Curious Knitters' Guide: Stories, Patterns, Advice, Opinions, Questions, Answers, Jokes, and Pictures" that really works:  Kay and Ann suggest, as many people do, to carry the yarn up the side, in between stripes.  In addition, and, this is the really good tip, "When changing colors, for the first row of a stripe, pull the new color around your needle from behind the old color"  This works great for alternating stripes of color.  For more tips on stripes, check out the book.)


All of this depends of course on what colors you use and the weight of the yarn.  Vivian Hoxbro suggests using a heavier weight for the row with the beads, which does help them stand out more.


However you do it, this technique is a great addition to your pattern stitch techniques and looks like you did a lot of work, when you didn't.  And, who doesn't like that?!?!

Saturday, September 02, 2006

Felted Bag Magnetic Snap How-To

For felted bags, I have a suggestion for how attach the magnetic closer or snap that I discovered after several trials.


Instead of attaching the magnetic snap to plastic canvas, (as many “how-to” instructions, fabric stores, etc. will tell you)


1.  Take the felted swatch you made for the purse (you did that, right!?!)

2.  Cut a square or rectangle slightly larger than the snap (you will need room to sew around the snap since you will be sewing the felted square/rectangle to the inside of the purse once the snap is attached.

3.  Use the prongs of the closer/snap to poke holes in the felt (or you may need to use the points of sharp scissors), centered on the felt piece.

4.  Bend back the prongs so that they are flat against the felt piece.  Instructions say you can use your fingers, but I use pliers.  That way I get a good connection between the snap and the felt.  You don’t want the snap to pull out of the felt.  When the snap is in use, there is a lot of pressure on the snap.

5.  Then, sew the felt piece, with the snap ½ installed on the inside of the purse, usually in the middle.

6.  Repeat with the other snap half; align, sew and you are ready to go.

Here are a couple of photos of the snaps installed in the felt piece before it has been sewed into the purse:


Front


Back


The nice part about this is that the backing for the snap “matches” your purse exactly.


Gauging the Gauge

Valery               


Clara


I recently received Hip Knit Hats: 40 Fabulous Designs
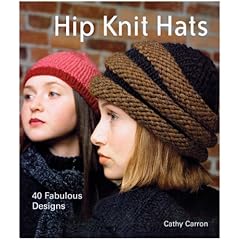
, Cathy Carron's book about, hats!  

I thought I would give Yarn.com's or (Webs as they like to call themselves) Berkshire Bulky a try so I ordered several colors to make the Valery and Clara hat.


Photo of Valery in solid color from Pond's Edge


Valery calls for size 11 (US) needles, bulky yarn and  2.5 stitches/inch.  Webs says Berkshire Bulky will knit up at: 3 sts = 1 on #10 needles, so I thought on 11s there was a good chance it might work. 


While I was waiting for my order from Webs, I saw several other hats in the book, that I wanted to make, Skye and Hilda.  Skye calls for Chunky yarn and size 10 (US) needles with a gauge of 3.5 stitches/inch.  Another hat, Clara, called for #9 (US) with a gauge of 3 stitches/inch, chunky yarn.


Photos of Skye and Hilda from Pond's Edge


Knowing that knitting combines art and science and math and that one woman's bulky is another woman's chunky, when the Berkshire Bulky (BB) arrived, I swatched.  I tend to knit right to gauge.  I practice Combination Knitting or you might say I am a combination knitter.  So, I thought it would be interesting to see how BB worked up on 11s, 10s and 9s, respectively.


I cast on 20 stitches and knitted 10 rows.  With the 11s, I got my 2.5 stitches/inch.  With the 10s I got 3.5 stitches/inch and with the 9s I got 3 stitches/inch.    I didn't get 3 stitches/inch as yarn label indicated I would using #10 needles.  Go figure.


My Valery came out quite well after consulting the errata  for the pattern on the author's website.  So did Clara, if I do say so myself!


Be certain to do this if you are knitting any of the patterns from this book.  While the patterns are cute, the book is full of mistakes.


Here is a photo of my Valery...


And here is the Clara Hat that I knit with a Noni Bags camellia as an embellishment.